13 Oct 2014
Beats by ACM is a network jukebox that allows ACM@UIUC members to play music out of the speakers in the ACM Office. It’s one of my largest personal software projects to date.

How it works
Users log into the Beats web frontend and queue up songs to be played, which can be either songs that have been loaded into the application, or any video on YouTube. Songs in the queue are scheduled using an algorithm known as packet-by-packet generalized processor sharing (PGPS). This algorithm is intended for scheduling network packets, but I adapted it for music scheduling by equating songs to packets and song length to packet size.
PGPS allows for a service (in this case, play time on Beats) to be distributed fairly to multiple users. It takes into account song length, the user that queued the song, and the time at which they queued it to determine the order in which to play songs on the queue. This scheme allows for different users to be given different weights, which would grant them a larger or smaller proportion of a given amount of play time, but in my implementation all users are given equal weight. Thus, songs queued by different users will be scheduled in such a way that all users on the queue at a given point in time get a similar amount of play time per unit time, or in other words, a similar “rate” of Beats usage.
In Beats, however, users can also vote for songs, which increases their individual weights and can potentially bump them in front of nearby songs in the queue. This functionality is a feature of Beats, not part of the actual PGPS specification.
[](/images/2014/10/beats-artist-screenshot.png)
_Artist view. Album art support has [yet to be implemented](https://www.youtube.com/watch?v=LDzH7ecKt7U)..._
The Beats backend itself is written as a REST API server in Python using Flask. It uses libVLC Python bindings for media player integration, and the Python library Pafy is used to retrieve YouTube stream URLs and metadata. Song metadata and queue data are stored in a MySQL database. The PGPS scheduler is implemented here.
The frontend is an AngularJS application largely written by Zach Reizner, an ACM member who graduated last year and narrowly avoided the responsibility of maintaining the system. User authentication is handled by ACM’s Atlassian Crowd server, which checks a user’s credentials against the UIUC Active Directory server and also verifies that the user is an ACM member.
Beats replaced the Acoustics Media Player, a similar system that became unmaintained over time and was eventually retired last year. I began developing Beats in February, and deployed it at the beginning of this semester. It’s been serving ACM faithfully since August, and currently has over 18,000 songs in its library. The software supports multiple players with separate queues and a shared music library, and thus Beats instances are currently deployed in two of the three rooms in the ACM Office. The project itself has already seen a number of pull requests, so I am hopeful that Beats will continue to be maintained after I graduate.
22 Jul 2014
This past weekend was the Khan Academy Healthy Hackathon. Check out Ben Kamens’s blog post for details about what exactly the Healthy Hackathon is and what makes it special, but in a nutshell, we were required to be “healthy hackers.” In other words, we had to eat healthily (no junk food) and sleep well every night. To that end, everyone is kicked out of the office at 11:45 pm and let back in the next morning at 9:30 am.
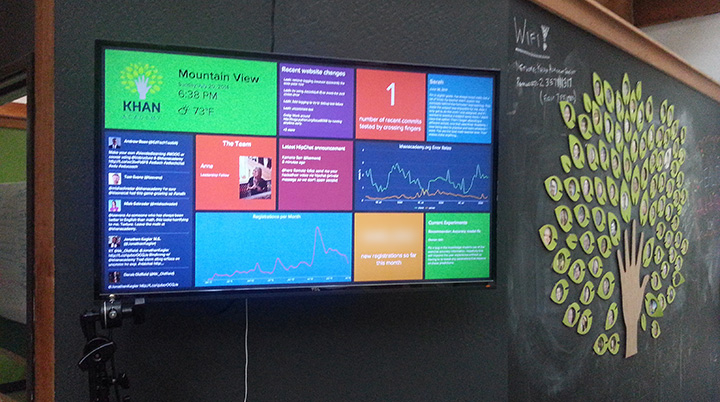
My team’s goal was to make “a beautiful new ‘KA today at a glance’ dashboard” for our soon-to-be new office. Each member of my team was in a different part of the US — Mountain View, Princeton, and Boston — but we still managed to be very productive thanks to science (read: HipChat). After three days of long-distance hacking, this is what we ended up with:
The Khan Academy Dashboard (a.k.a. the KAshboard)
The KAshboard is essentially a web application optimized for a 1080p display. The web frontend is built entirely with React, and the backend uses Node.js and Express. The backend exists mainly to make the variety of API calls necessary to retrieve all the relevant information (Twitter, GitHub, Google BigQuery, etc.). It also does some caching for website analytics data obtained using BigQuery.
Here are some details on a few of the widgets on the dashboard.
- Fingers crossed
- All of our commits require test plans in the commit message. When a change is either trivial or not testable locally, we usually write "Fingers crossed" for the test plan.
- Khan Academy Stories
- The widget at the top right cycles through recent stories submitted to Khan Academy. We did some really simple spam filtering here because no, none of us are interested in applying for a loan at the moment.
- Current experiments
- This widget showcases ongoing experiments on BigBingo, our A/B testing framework.
The KAshboard source code is available on GitHub. Shout-out to Colin Fuller and Tony Liu for hacking from the East Coast!
As an aside, I also made my first real contribution to an open source project during the hackathon. Woohoo!
15 Jul 2014
A few years back, I discovered Gyazo, a lightweight tool that allows you to effortlessly share screenshots. Its usage instructions are dead simple: Click and drag to select a region of your screen you want to capture. Release the mouse button and Gyazo uploads the screenshot its servers. The screenshot then magically opens in your browser, and its URL has already been copied to your clipboard.
This was a huge improvement over my previous workflow which involved hitting Print Screen, pasting the image into an image editor, cropping, saving, going to ImageShack.us (how nostalgic), and uploading. A minute-long operation now took about a second. Fantastic!
Until they started displaying ads. I didn’t mind at first, but then they had the gall to add pop-ups and interstitial ads. Not cool. So I googled “Gyazo alternatives” and found SpeedCap. I used SpeedCap for a while, but it frequently went down for maintenance and failed on large screenshots.
So I decided to make my own.
Introducing Amazon S3 and CloudFront
I decided to host my screenshots using Amazon Web Services. Specifically, I use two AWS services: S3 for storage, and CloudFront for content delivery. With AWS, you pay only for what you use, and when it comes to hosting images, that’s not much. The total cost of using these two hardcore, enterprise-class services for screenshot hosting is about ten cents a month. For comparison, Gyazo charges $2.99 a month for premium.
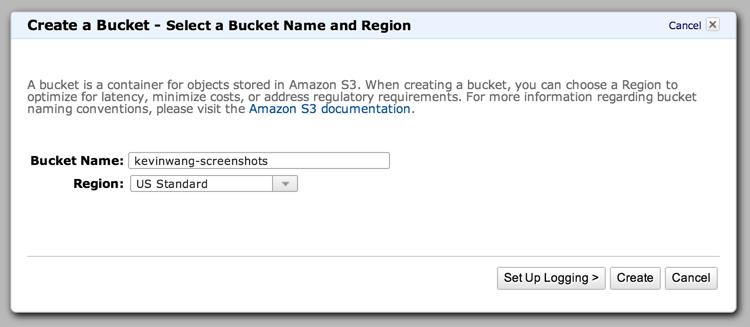
Creating an S3 bucket
To begin, we’ll need to create an S3 bucket for our screenshots. Buckets are where all objects in S3 are stored. Follow the instructions here to create a bucket. Here, I’ve named my bucket kevinwang-screenshots.
Creating a CloudFront distribution
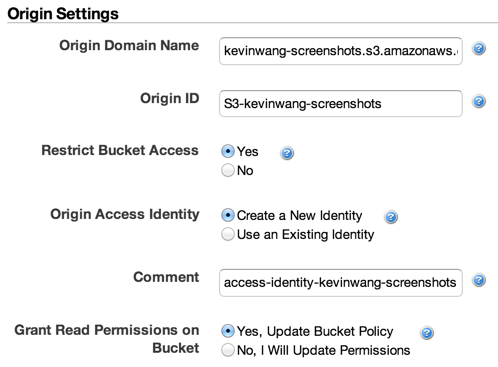
Now we’ll need to connect our new S3 bucket to Amazon’s CDN, CloudFront.
In the AWS console, go to the CloudFront console and click Create Distribution. Select Web and continue. Click into the Origin Domain Name field and select the S3 bucket you just created (bucket-name.s3.amazonaws.com). The Origin ID will autofill.
Since we only want to serve images through CloudFront, select Yes for Restrict Bucket Access. For Origin Access Identity, select “Create a New Identity,” and for Grant Read Permissions on Bucket, select “Yes, Update Bucket Policy.”
If you have a custom domain name you want to use for your image host, add it to “Alternative Domain Names (CNAMES).” Otherwise, you’ll have to use an unsexy domain name like d2j5nv0uysqvdx.cloudfront.net. If you choose to use a custom domain name, you’ll also need to add a CNAME record from your custom domain name to your unsexy CloudFront domain. In this example, I will be using screenshots.kevinwang.com.
That’s it for setting up your backend. Now let’s make a client.
Note: My script is specific to OS X, but you can easily adapt it for Linux by substituting scrot for screencapture and xclip for pbcopy, among other things.
Our screenshot tool will be a simple bash script. First, you will need to install and set up S3cmd, a command line client for S3.
$ brew install --devel s3cmd
# --devel because `s3cmd info` breaks on subdirectories in 1.0.1.
$ s3cmd --configure
And without further ado, the code:
Some notes on this script:
-
What is resample_dpi?
Retina MacBook Pros take high-res screenshots by virtue of their kickass pixel density, but the resulting images appear scaled up as a result. This script by Ben Alman fixes the resolution of screenshots taken on Retina displays. The script is also included in the Gist.
-
What is generate_unique_filename doing?
Two things. First, it combines a number of Unix commands to generate a random 6-digit alphanumeric filename. Second, it checks whether an image already exists in the bucket with that filename by checking the exit code of s3cmd info. If there is a collision, it tries again.
-
Why absolute paths for everything?
Because Automator requires it. Which brings us to our bonus round!
Bonus round: Mapping the script to a keyboard shortcut
In OS X, Cmd-Shift-4 takes a regular screenshot by default. Let’s make it run our screenshot tool instead.
Open Automator and create a new service. Configure it as follows, and save it with a meaningful name like “Upload Screenshot.”
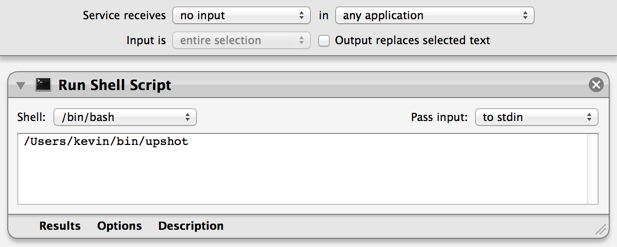
Then open System Preferences and navigate to Keyboard > Shortcuts. Untick “Save picture of selected area as a file.” Now go to Services and scroll to the very bottom where you’ll find the service you just made. Assign your service the shortcut Cmd-Shift-4, and you’re done!
14 Jul 2014
I’m Kevin, a rising sophomore Computer Science major at the University of Illinois at Urbana-Champaign. I figured I’d start a blog. Here goes nothing.
Moderately interesting bio
I’ve been fascinated by computers for as long as I can remember. I built my first computer in 2006, at age 11. That baby had a dual-core AMD Athlon processor, 1 GB of memory, 80 GB of storage, and ran Windows XP. Around the same time, I discovered HTML, and I made a state-of-the-art website with tables, “Under Construction” gifs, and probably a <marquee> element or two. If I recall correctly, it was modestly titled, “Kevin’s Awesome Website.”
My first real exposure to programming was at an iD Tech Camp at Fordham University in 2009, the summer before my freshman year of high school. There I took a one-week “Programming in C++” course. I came out of the course with my own text adventure called Game, in which you play as a secret agent tasked with stealing KFC’s secret recipe. More importantly, however, I came out of the course with a newfound passion for programming.
Shortly afterward, I entered Stuyvesant High School, which was to be the most stressful yet rewarding four years of my life thus far, and a topic about which I will most certainly write more in the future. There, I joined the school’s FIRST Robotics team as a freshman—specifically, its programming division, where I learned how to work with, and later coordinate, a team of software engineers to write robot code in Java. From sophomore year onwards, I took every CS course offered by Stuy, and graduated with highest honors in Computer Science.
I graduated from Stuy in 2013, and have just finished my freshman year at UIUC, where I am a member of ACM@UIUC, the UIUC student chapter of the Association for Computing Machinery. I am spending this summer as an software engineer intern at Khan Academy, an experience about which I will go into more detail in a future post.
Finally: Why did I choose to start a blog?
I’ve been meaning to start a blog in order to share my experiences as a developer and as a human being. As it turns out, one of the three pillars of development at KA is to “Be open. Share your work.”
Focus on sharing our work both internally and externally with the entire community. Blog about your work. Tell the whole team when you deploy something new. Open source any useful frameworks. Walk down the street and yell to a stranger whenever you ship. Be open, we work on cool stuff.
To which I say: What better time to start than now? Blog I will! I look forward to seeing where this will go.
